I went on an epic quest for the power supply for my N64 that ended up taking me to the magical land of Goodwill, wherein I picked up a second console, power supply, and controller for 10 bucks. So, of course, I had to dismantle it as soon as I got home. Here is the power supply all nice and disassembled:

The N64 power supply, while lovely, is not capable of the voltage and amperage requirements I need. (5 volts +/- 1% capable of around 2 amps)
I also picked up this lovely powered USB hub at Target that has those exact specs and I needed a 4 port hub for the RasPi anyway.

However, I kinda broke the be-jesus out of the power supply when I opened the case... that's the main power transformer you see shattered beside the board... Kinda put me back at square one for a little while and I may or may not have said some things I'm not proud of lol.
(Note to self: don't open sensitive electronics with a sledgehamer...)

Luckily, I found this gem a few days later at the flea market with Caytee and it matches the original specs of the one that 'malfunctioned' (yeah lets go with that)

5ish volts 2+amps= close enough...
Now to get it to work, I've got to wire up the original N64 leads and change out the wire for the usb hub's wire.
The 64's power leads:

Wiring the usb hub's leads to the new power supply:

I left the leads attached while I figure out what pins need to go where on the board.

Enter Mr. Sharpie and my bad art skills... The long line is actually my 'cut-line' for later, in other words; the farthest I can cut the board and the switch still work.

In the end I went with the +3.3 and +12 lines on the board for a few reasons:
1: They are both switched at the main power switch
2: I don't want to wire to the ground in case there are any exposed edges that might touch the Pi ending in a baked Pi... (ok that one was bad...)
3: It was less work that running wires everywhere
It also means killing the n64 board for good, and I feel bad for doing it, but it must be done...
This is where I had to break the circuit to the console from the main power switch so the actual 64 circuitry isn't doing anything, cause that would be no bueno.

I thought it would be pretty awesome if the original led lit up when I turned everything on, so a little measuring, some math and some wiring later, I got all this nonsense wired up and working. I actually found the exact resistor I needed on the board, so I took it off and wired it in. It was a bit of challenge; the resistors on the board are rediculosy small...

Once I figured out which pins I needed to go to, I wired in the power supply connector and I must say it fit just perfectly. I was really worried that the much smaller usb power supply would rattle around inside the lager casing, but it seems to fit perfectly :)

and the lid fits back on perfectly too!!!

Put it all together and hit the power switch: MIGHTY MATH POWERS!!!!!

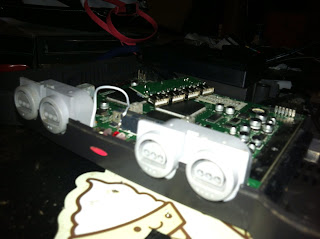
Here I've gotten the leads from the main power switch hooked up and running back to the usb hub. The voltage is exactly what I need for the RasPi and the usb hub, but more on actually powering the Pi when it gets here. That will be a fun one :) just you wait Mwahahahahahahahaha

I wanted to see how it would look once i get it all reassembled with the led working, so stuck it back together for a min:
With the top cover re-installed and a cartridge put in, this will be very close to what the final product will look like. It totally turns on and off with the factory power switch too. I do need to hunt down a cover for that expansion port; it looks terrible open like that.

Now it's just a waiting game for the parts to come in :/ Hopefully I'll have more for you soon...
No comments:
Post a Comment