Wednesday, September 21, 2016

I've launched a YouTube channel.

So going forward, I will be posting updates to my projects to my new YouTube Channel. Please like, subscribe, and share it with your friends. I have a lot of big plans for the channel, but I'll need your help to get there. 
I'm starting a few big projects already and also a weekly segment we're calling "Fix-it Friday" so there will be regular updates, something I've struggled with on here for sure. 
Anyway, go check out my channel and let me know what you think!

Friday, July 19, 2013

Updating Raspbmc

So I had an interesting adventure installing the latest version of Raspbmc. For some reason, the Raspi64 completely crashed when I tried to update over the air. I then tried to do a fresh re-install using the 'install to usb device' option, which also kept failing. This meant I needed to open up the case and reformat the internal USB drive... So I figured this was a great opportunity to take some more internal pictures for you guys!
Shown here with the top removed:

Here are some shots of the USB hub and wifi card packed in tightly

In this you can kind of see my USB thumb drive the system is running from. I had to remove the casings from all of these devices so they could fit inside. It is a rather tight squeeze in there. I actually have to have everything aligned perfectly to even get the top to fit back on :)

Anyway, back to the story. I finally got Raspbmc to reinstall after a few hours of trial and error. What I ended up doing, was letting this system do the initial installation, to initialize the USB drive. When it called for a reboot to continue, I had to hook it up on my Bench 'Pi (which I just repaired)  to finish the updates and kernel initialization and such.

Here is my bench 'Pi  finishing the updates.

When it finished, I hooked everything back up without the top case (just in case it didn't work) and fired it up!

Between the 'Pi's LEDs, the flashing orange and green from the USB drive and wi-fi card, an the red N64 LED, it puts on quite the light show. I tried to time the picture to get all of them, but I couldn't get more than this shot.
Luckily, everything worked fantastically, I've sealed it back up, and it's running beautifully.  

Here's a shot of it up and running! I must say, I love the new Raspbmc confluence theme! I would like to see a higher resolution wallpaper though. It looks great at 720p, but I run this at 1080p and it looks a little grainy on my TV... :/ 

That's all for now! I'll keep you posted when I more done on it! 

Saturday, April 6, 2013

New projects incoming!

I'm starting an exciting new project semi-related to this one  I will add a link here when I get that project page up. But for now, I am in the need of a fairly large millennium falcon toy (at least 12 inches round) for "science". It will be dismantled and dismembered and made amazing. If you have one to donate to the cause or sell me cheap let me know. Note it will be used for science so you won't be getting it back :)

In related news, A trip to megathrift and goodwill and 15 bucks later and I have added a 1985 original Nintendo and a 2nd run PSX to my collection. I am sad to say they both seem to work fine, so I won't be demolishing them for science... yet. I do need to bum an NES controller and game to see if the Nintendo actually runs but it powers up nicely. The PSX plays cd's nicely using the PS2 hookups so it should play games as well. 
Still no luck on finding my (cheap) millennium falcon though... If any of you spot one give me a shout.


Saturday, March 30, 2013

Etsy

I opened up an etsy shop to sell off some of the cool things I've made from the guts of my 64 from this project and the other cool things I'll be making in the near future! So go check it out!

http://www.etsy.com/shop/BakaShop

Sunday, March 17, 2013

All buttoned up

So I have pretty much wrapped it up. I've worked out all the kinks I've run into so far and will continue to post updates as I run into more. Here are a few of my finished product pics! Enjoy!
The final interior layout before I buttoned it up. I ended up re-installing Raspbmc to a usb drive to be left inside the 64 that I forgot to snap a pic of before it went in, though it still needs the sd card in the cartridge to boot.

A better pic of the HDMI hookup


HDMI from the side and the external USB port (and my favorite pen)

External ethernet jack: the pi has a wireless N 150 card installed inside, but the re-installs are so much easier from the wired connection. 

A view of the undercarriage 

From the top: you can see the a/v ports through the memory expansion port

Front view without cartridge:

With cartridge:

I also recorded a short video showing the boot and shutdown here: please excuse the pony, she's a good luck charm :)

Thats all for now! Hope you like it!


Tuesday, November 20, 2012

USB ports and DLNA


I have been toying around with a few ideas, as far as how to get a usb port on the outside of the Raspi64; mostly where to put it, the how is pretty straightforward. 

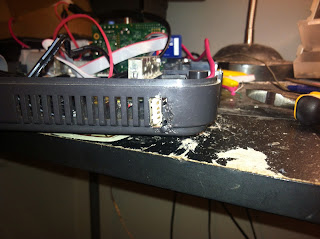
I decided to knockout a few vents from the side near the back and have it come out that way. Here I've gotten the port removed from the USB hub and wired up to this pink cable. The cable is an old iPod cable that crapped out on me and had lovely braided wires inside, which make my life so much easier that the enamel coated ones that most smaller cables are using these days. 

I used some pliers to break away a few of the fins on the back-right side of the case and used the RotoZip to clean it up and made it a smidge bigger so the plug would fit. 

Checking the fit:

Making sure I didn't mess the port up during the process:

I did a bit of "plastic welding" with the bits I broke off and my soldering iron. I really don't recommend trying that. It's rather difficult to make sure the whole thing doesn't just catch fire and the smell is fairly ungodly... I did it anyway and it is rather sturdy and doesn't look too awful considering I haven't done it before. 

Another shot of the finished port:

Then it is just a matter of wiring the port back up and making it all fit back inside.  I should also mention, it is always in your best interest to double-check your wiring before you start powering things on. I checked my order for these wires about 5 times before I started soldering, flipped the board over and wired them up in reverse order... Fortunately, it only cost me a wired keyboard and not my 1TB hard drive, but I just got lucky on that one. I took the pic with it backwards, I didn't think it warranted another picture of me fixing my goof-ups. :)  

Here is everything packed back into the main shell. I can't bolt it all up just yet as I am waiting on my last few parts to come in (hdmi port and RJ45 port) but they should be here in the next week or so. I will have a nice detailed post about cutting out the ports in the back so look foreword to it!

In my last blog I mentioned the DLNA software on my iPad and iPhone and promised you some pictures of it so here they are!!!!

8player on the iPad seeing the Pi like a champ:

Dreamworks' How to Train Your Dragon in 1080p  

A better screen capture of it:

8player on my phone, also working splendedly:

That's all for now folks! Please feel free to leave me comments and feedback. Do you have questions I haven't covered? Do you want more details? less details? 
If you are good I might just let you take a sneak peek at the plans for my next big project! ;)

Thursday, November 8, 2012

Software!!!!!

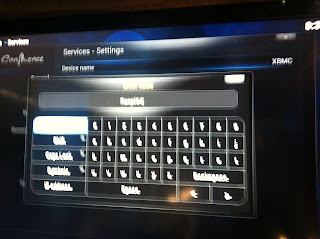
So it looks like I'm leaning towards using this Pi for primarily a media center, and getting another later on to learn programming and to tinker with more extensively. So here is what I have working so far! I figured out how to set the name:

I also discovered, while perusing the settings menus on the Pi, that it is capable of performing as both uPnP device (hosting and recieving), and as an AIRPLAY receiver!!!! Needless to say, being the Apple fanboy that I am, this is exciting news. So I turned it on, fired it up and within a few mins I was streaming like a boss. I was hoping that I could use this as a work-around for Netflix, since they seem to hate Linux users and such, but to no avail. It seems that Netflix will only stream audio over airplay... No huge loss there since I have 4 other devices on that TV that do support Netflix, including the tv itself. Yes, I am a nerd... but if you are actually reading this blog then you are ok with that in the first place :p 
Many other services streamed perfectly though including Crunchyroll and the Videos app, as well as the music app, which I have been enjoying thoroughy.
Here is a screenshot of the iPad streaming to it on what I'm pretty sure is crunchyroll:
And youtube from my iPhone:

Now, it's not perfect, but it works. For instance, on the iPad if I am streaming for more than 15 mins I have to keep it awake or the iPad goes to sleep (and subsequently it turns off the wifi) but I have the ever-so-useful jailbreak tweak "PreventSleep" to do that for me. I highly recommend this tweak if you do any amount of downloading or data transfer on your device. 

I also hooked up my movie USB drive up to it and set it up as a DLNA server to stream that drive to my other devices. DLNA, for those not familiar with it, is a local streaming protocol that is pretty universally used. I could see it on my PS3, Xbox 360, iPad and iPhone (using 8player ~$5) but not the Roku, sadly. 

That's pretty much it for now! I'll have a blog in a few days about the DLNA stuff, I forgot to take pics...