Tuesday, November 20, 2012

USB ports and DLNA


I have been toying around with a few ideas, as far as how to get a usb port on the outside of the Raspi64; mostly where to put it, the how is pretty straightforward. 

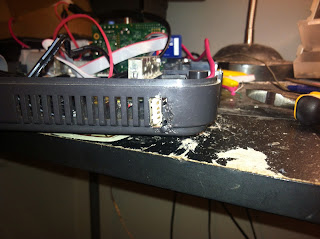
I decided to knockout a few vents from the side near the back and have it come out that way. Here I've gotten the port removed from the USB hub and wired up to this pink cable. The cable is an old iPod cable that crapped out on me and had lovely braided wires inside, which make my life so much easier that the enamel coated ones that most smaller cables are using these days. 

I used some pliers to break away a few of the fins on the back-right side of the case and used the RotoZip to clean it up and made it a smidge bigger so the plug would fit. 

Checking the fit:

Making sure I didn't mess the port up during the process:

I did a bit of "plastic welding" with the bits I broke off and my soldering iron. I really don't recommend trying that. It's rather difficult to make sure the whole thing doesn't just catch fire and the smell is fairly ungodly... I did it anyway and it is rather sturdy and doesn't look too awful considering I haven't done it before. 

Another shot of the finished port:

Then it is just a matter of wiring the port back up and making it all fit back inside.  I should also mention, it is always in your best interest to double-check your wiring before you start powering things on. I checked my order for these wires about 5 times before I started soldering, flipped the board over and wired them up in reverse order... Fortunately, it only cost me a wired keyboard and not my 1TB hard drive, but I just got lucky on that one. I took the pic with it backwards, I didn't think it warranted another picture of me fixing my goof-ups. :)  

Here is everything packed back into the main shell. I can't bolt it all up just yet as I am waiting on my last few parts to come in (hdmi port and RJ45 port) but they should be here in the next week or so. I will have a nice detailed post about cutting out the ports in the back so look foreword to it!

In my last blog I mentioned the DLNA software on my iPad and iPhone and promised you some pictures of it so here they are!!!!

8player on the iPad seeing the Pi like a champ:

Dreamworks' How to Train Your Dragon in 1080p  

A better screen capture of it:

8player on my phone, also working splendedly:

That's all for now folks! Please feel free to leave me comments and feedback. Do you have questions I haven't covered? Do you want more details? less details? 
If you are good I might just let you take a sneak peek at the plans for my next big project! ;)

Thursday, November 8, 2012

Software!!!!!

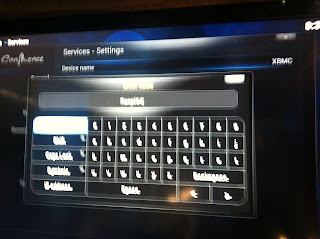
So it looks like I'm leaning towards using this Pi for primarily a media center, and getting another later on to learn programming and to tinker with more extensively. So here is what I have working so far! I figured out how to set the name:

I also discovered, while perusing the settings menus on the Pi, that it is capable of performing as both uPnP device (hosting and recieving), and as an AIRPLAY receiver!!!! Needless to say, being the Apple fanboy that I am, this is exciting news. So I turned it on, fired it up and within a few mins I was streaming like a boss. I was hoping that I could use this as a work-around for Netflix, since they seem to hate Linux users and such, but to no avail. It seems that Netflix will only stream audio over airplay... No huge loss there since I have 4 other devices on that TV that do support Netflix, including the tv itself. Yes, I am a nerd... but if you are actually reading this blog then you are ok with that in the first place :p 
Many other services streamed perfectly though including Crunchyroll and the Videos app, as well as the music app, which I have been enjoying thoroughy.
Here is a screenshot of the iPad streaming to it on what I'm pretty sure is crunchyroll:
And youtube from my iPhone:

Now, it's not perfect, but it works. For instance, on the iPad if I am streaming for more than 15 mins I have to keep it awake or the iPad goes to sleep (and subsequently it turns off the wifi) but I have the ever-so-useful jailbreak tweak "PreventSleep" to do that for me. I highly recommend this tweak if you do any amount of downloading or data transfer on your device. 

I also hooked up my movie USB drive up to it and set it up as a DLNA server to stream that drive to my other devices. DLNA, for those not familiar with it, is a local streaming protocol that is pretty universally used. I could see it on my PS3, Xbox 360, iPad and iPhone (using 8player ~$5) but not the Roku, sadly. 

That's pretty much it for now! I'll have a blog in a few days about the DLNA stuff, I forgot to take pics... 

Monday, November 5, 2012

Progress update!!!!!!!

So where to start... I've done so much work on this in the past week it's hard to keep up. Let's get started! I fired up the Pi and installed Raspbian on the first SD card, but I won't go into much more detail than that. The install took somewhere around 14 hours and the GUI is slow and not very attractive, though I did overclock the processor a bit to compensate, which made it at least usable. I will primarily be using Raspbmc anyway so that's really all I'm gong to say about that for now. I will have a post soon about my issues with software and whatnot.

Here are some shots along the way:
At first I pretty much just stuck the Pi on top of the board of the 64 to make sure it worked before I started cutting stuff up. Here is the Pi chilling in the 64:

Running Raspbmc on my TV via HDMI

My dad let me borrow his RotoZip tool, which for what I'm doing is perfectly fine. and cut out the guts of the board. It was a sad thing to destroy such an electrical work of art, but it had to be done. There were capacitors and resistors flying everywhere, and I have a ton of little microchips laying around now. I may make some decorations out of them later on. 

Here is the nearly final layout of how everything is fitting in the case.   


I say nearly because I am still waiting to buy the HDMI extension and I found that I am going to need to move a few more ports out  to the back of console. I am having issues with the wifi reliability so I need to put an ethernet port in... I also need to put at least another usb port externally as well. I am going to be using this as a media center/server so I need to be able to hook hard drives and such up to it as needed.

Bottom View:

The buttoned up console: 
(Note: I am running this via the N64's A/V cable as I haven't gotten the HDMI port in yet) 

Booting up:

This is the on-board LED on the board of the PI through the expansion port hole... I need to get a cover for that at some point.


That's it for now! Much more to come soon, I'm just out of time and pictures for now... 


Thursday, October 25, 2012

It's Here!!!!

So the day has finally come! I got my RasPi in the mail and figured I would post some unboxing pics for you. I was super excited to see that I have recieved one of the new 512 mb models. 
one step closer:
I am amazed at how much computer they packed into such a small package. Moreover, how absurdly small that package is. Here you can see it on my iPhone 4:

I don't have any pics for this next bit, but honestly, it is not that easily photographed. 
I got the Pi hooked up to the tv and after 14 hours of compiling I got the debian port for it, cleverly called Raspbian, installed. I immedeately started the build of the xmbc port, Raspbmc, which will be my primary usage of the pi when I get all this buttoned up. Much to my surprise the install went rather quickly, only to find out that it didn't work once I switched it to HDMI... Now, seeing as I am going to use this as a media center for the tv, that is certainly a problem.
 I spent the next 4 hours tinkering with the config.txt file before I realized that notepad wasn't inserting the right "enter" key for the pi to read it. (something about using carriage return instead of line break, but I don't remember which is which. I do know that if you are in knoppix using leafpad, that works,  but not windows and notepad...) 
I ended up logging into my Pi via ssh from my iPad's MobileTerminal (Jailbreak ftw) and manually setting the tv to find the right mode (mine was "32" or 1080p 24hz) then using knoppix live boot to edit the config.txt and now it's booting perfectly. I will have to go back and do the same for the raspbian one, but it shoudn't take nearly as long. If you want to know the exact teminal commands to do that let me know in the comments below, otherwise I'm not going to go into it here. 


I'll be buttoning all this up as soon as the last few parts come in, some of which I still need to order. I think all I have at this point is the wireless card, the keyboard with trackpad installed, possibly a usb infared remote, a new dremel to add some ports, and the hdmi adapter to go out the back. But so far so good :) I may do another post about fixing the resolution later as I fix the raspbian card. 
Thanks for reading! I'll have more for you soon!

Wednesday, October 17, 2012

More progress

Alright, I had some significant progress since my last post so here's an update.
I wired up my audio adapter and video wires up to the N64's built in a/v connector and notched the board to make room for the wires to come through. 
I had an interesting predicament trying to test the a/v connection. I don't have any devices that have the standard RCA female plugs on them... I ended up hooking my Dreamcast to an old a/v switcher, my video cable to the output of the switcher, then the factory a/v N64 cable directly to the tv. I got a bad shot of it plugged up, but I couldn't get one of the tv and all the wiring and, quite frankly it's not that important, save that it worked. I tested the audio by hooking the 3.5mm jack to my phone and it seems to work perfectly as well.
I had to make some room for the power cable to go to the raspi so i figured,  may as well look into extending the usb ports. It took soome effort to actually get the port detached; they really had it put on there well, but I managed. Here is a shot of the usb port wired up to act remotely. I haven't decided if I am going to put another hub in to access from the outside of the console yet, so I may stick this through one of the sides and just go with it. The original pans I drew up involved taking a 4-port USB hub and relocating the portss to stick through the ram expansion door, but I am having a terrible time trying to find that little thing locally...  but that is another adventure for another day. 
A closer shot of the USB wiring. You may notice I only have 2 of the wires on the Raspi's cable hooked up, USB uses 4 wires by default for those who don't already know. The ones I have wired up are the power ones only (+5v and ground) while the other 2 (data 1 & 2) have been snipped off. I did this to avoid any weird data redundancies. For instance, the raspi trying to talk to it's power port from it's usb port through the hub here. I don't think the data pins on the Pi's power port are connected, but I would rather snip a few wires than ruin the entre system; better safe than broken.

I saw a cool pcture online of the Pi as compared to a gift card and I think it is close enough that I can ballpark what my layout may end up looking like. So I grabbed Mr. Sharpie and an old giftcard, referenced the FAQ page of raspberrypi.org, and I have a "close enough" mock board. Here is an approximation of where it will end up inside the N64. I won't do any cutting till I have a board in hand though. 

MY SD SOCKETS CAME IN!!!!!!
I feel it worth mentioning that I got these from Newark/element14, and it was an altogether pleasent experience. No they aren't paying me to say that, it was just such a great buying experience that I feel it worth remarking about.
So time to break out that crappy perf-board I bought a few weeks ago and finish some cartridges!  
With the wires attached:
I origially was going to have a seperate game cartridge for each of the SD cards of the system, but Caytee suggested that I have at least one of them be removeable from the outside, so I took her advice and until I get all the  parts in and the kinks worked out, I'll stick with just this one. But once I do have everything functional, I'll hard-wire the other cards in. 
Lining up the socket inside the cartridge:
I stumbled on this SD card at Big lots for $8 so I picked one up lol. Here are a few shots of the finished (for now) cartridge. I am a little sad it still says Madden, but I'm gonna have soome spiffy logos made up for each of the distros' logos. This one is going to end up being Raspbian, the official Debian distro for the Pi, but thats another blog entirely and, frankly, there are enough resources that are well more qualified than myself who detail the distros in detal. At best, I'll find some and link them here when I get to it. 
The SD card installed top view:
And front view:
That's all for now! I hope you enjoyed reading it as much as I enjoyed writing it! Tons more to come soon, stay tuned! Too many exclamation points!!!!!!!!!!11!!one!!!!

Monday, October 8, 2012

I was told I had to post this...

cats in sinks that is all...

Power Supplies... How I loathe power supplies

I went on an epic quest for the power supply for my N64 that ended up taking me to the magical land of Goodwill, wherein I picked up a second console, power supply, and controller for 10 bucks. So, of course, I had to dismantle it as soon as I got home. Here is the power supply all nice and disassembled: 
The N64 power supply, while lovely, is not capable of the voltage and amperage requirements I need. (5 volts +/- 1% capable of around 2 amps)
I also picked up this lovely powered USB hub at Target that has those exact specs and I needed a 4 port hub for the RasPi anyway.
However, I kinda broke the be-jesus out of the power supply when I opened the case... that's the main power transformer you see shattered beside the board... Kinda put me back at square one for a little while and I may or may not have said some things I'm not proud of lol.  
(Note to self: don't open sensitive electronics with a sledgehamer...)
Luckily, I found this gem a few days later at the flea market with Caytee and it matches the original specs of the one that 'malfunctioned' (yeah lets go with that)  
5ish volts 2+amps= close enough...
Now to get it to work, I've got to wire up the original N64 leads and change out the wire for the usb hub's wire. 
The 64's power leads:
Wiring the usb hub's leads to the new power supply:
I left the leads attached while I figure out what pins need to go where on the board. 
Enter Mr. Sharpie and my bad art skills... The long line is actually my 'cut-line' for later, in other words; the farthest I can cut the board and the switch still work.
In the end I went with the +3.3 and +12 lines on the board for a few reasons: 
1: They are both switched at the main power switch
2: I don't want to wire to the ground in case there are any exposed edges that might touch the Pi ending in a baked Pi... (ok that one was bad...) 
3: It was less work that running wires everywhere
It also means killing the n64 board for good, and I feel bad for doing it, but it must be done...

This is where I had to break the circuit to the console from the main power switch so the actual 64 circuitry isn't doing anything, cause that would be no bueno. 

I thought it would be pretty awesome if the original led lit up when I turned everything on, so a little measuring, some math and some wiring later, I got all this nonsense wired up and working. I actually found the exact resistor I needed on the board, so I took it off and wired it in. It was a bit of  challenge; the resistors on the board are rediculosy small...

Once I figured out which pins I needed to go to, I wired in the power supply connector and I must say it fit just perfectly. I was really worried that the much smaller usb power supply would rattle around inside the lager casing, but it seems to fit perfectly :) 
and the lid fits back on perfectly too!!!
Put it all together and hit the power switch: MIGHTY MATH POWERS!!!!!
Here I've gotten the leads from the main power switch hooked up and running back to the usb hub. The voltage is exactly what I need for the RasPi and the usb hub, but more on actually powering the Pi when it gets here. That will be a fun one :) just you wait Mwahahahahahahahaha

I wanted to see how it would look once i get it all reassembled with the led working, so  stuck it back together for a min:

With the top cover re-installed and a cartridge put in, this will be very close to what the final product will look like. It totally turns on and off with the factory power switch too. I do need to hunt down a cover for that expansion port; it looks terrible open like that.
Now it's just a waiting game for the parts to come in :/ Hopefully I'll have more for you soon...